
Balance Druid Aka "Boomkin"

About the author
This guide was written, collected, and assembled by Whiteaura of Epic Bison, a Raid Leader and current GM on Lightbringer from various sources and forums. Some of which include the mmo-champion forums, icy-veins, personal experience, and the prominent balance druid theorycrafting site homeofthebalancedruid.
Spec Overview
The Balance specialisation provides an entertaining and challenging rotation, and it performs very well in terms of DPS when compared to other classes. In multiple target fights, Balance Druids can perform extremely well due to the multi-DoTting tactic. Balance druids excel at heavy AoE fights due to their consistent use of starfall, and besides.. "Laser Chickens".. nuff said.
Links
Links here
Changelog
• 9/13 Updated to 6.2.2 Hellfire Citadel
Rotation
Single Target Rotation
Balance Druid priority rotation for optimal single target DPS:
- Apply and maintain Moonfire with Lunar Peak.
- Apply and maintain Sunfire with Solar Peak.
- Starsurge with 3 charges of Starsurge – watch for Shooting Stars.
- Starfire with Lunar Eclipse.
- Wrath with Solar Eclipse.
Multiple Targets Rotation
Balance Druid priority rotation for optimal multiple targets DPS:
- Apply and maintain Moonfire and Sunfire on up to 4 targets.
- Starfall with 2 or more charges.
- Starfire with Lunar Eclipse.
- Wrath with Solar Eclipse.
Advanced Rotation
The balance druid’s DPS rotation(s) are fairly simple to understand and perform. However, for a more in-depth understanding, a good level of knowledge about how primary and secondary stats impact the balance druid spells is recommended.
The Balance Druid DPS Rotation is broken into 3 section. Single target, double target and Multi target. To avoid high levels of duplication, both the double and the multi target DPS rotation sections have been written in the assumption of the reader reading through the single target DPS rotation.
The Balance Druid Single Target DPS Rotation
There are two types of fights. Ones that require no movement, and others that do. The single target rotation seen below is best suitable for single target fights that require a small level of movement
The Single Target Pull Rotation
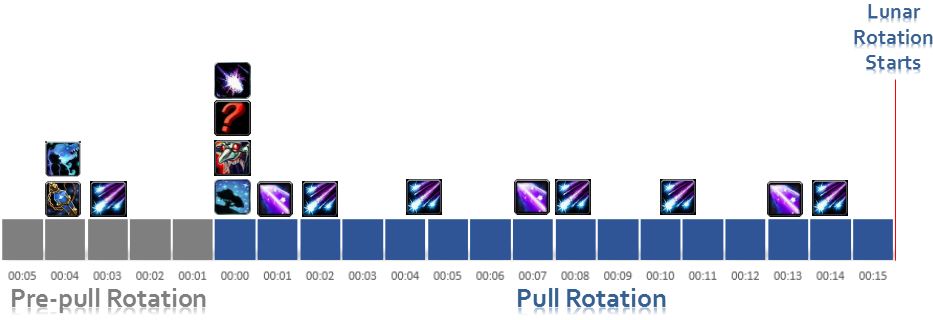
The Pre-pull Rotation begins at about 3,5 seconds pre pull. Start of by using Draenic Intellect Potion instantly followed by Incarnation: Chosen of Elune. Follow up with a Starfire thats strikes the boss on 0 Seconds followed by instantly popping Celestial Allignement (CA), usable Trinkets, DPS Racials and than apply Moonfire which due to CA simultaneously applies Sunfire . The reason for that specific order is that casting our dot triggers a global cooldown.
The reason we start the fight with Starfire is in hope that upon strike our passive buffs are triggered such as trinkets, weapon enchants, etc. Furthermore we wish to move our eclipse bar towards the lunar side in order to buff our DPS even more with the Lunar Empowerment buff which is triggered by Starsurge cast.
The next step is The Pull Rotation the pull rotation is to maximise our DPS output during our buffs uptime. Immediately after applying the dot as mentioned above, cast Starsurge followed by 2xStarfire. Repeat this till your eclipse bar starts moving.
Balance Druid Single Target DPS Rotation
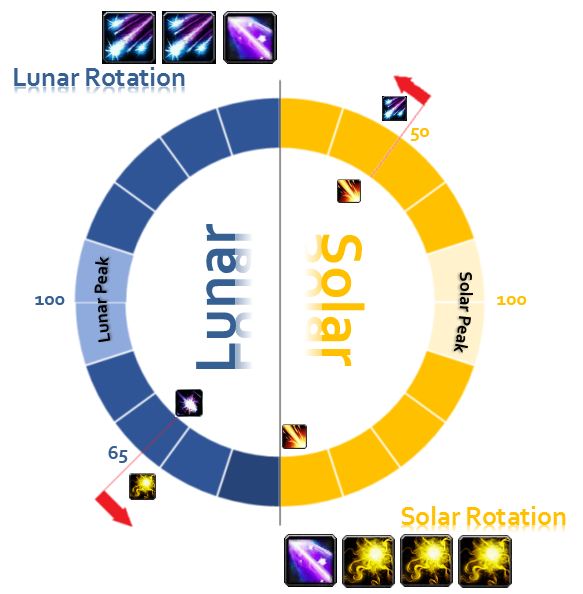
15 seconds into the fight your celestial alignment buff wears off and your Eclipse bar will continue it’s normal cycle. Follow the lunar Lunar Rotation by casting Starsurge followed by two consecutive Starfires. You might be unlucky with Shooting Stars not proccing, in that case continue casting Starfire until you reach 65 lunar energy (moving towards solar). 65 Lunar energy is the point in which the amount of time left in Lunar Eclipse is equal to Starfires Cast time (raid buffed). Only Cast Starfire if you have sufficient haste to finish the cast within the remaining of Lunar Eclipse, if not use this opportunity to re-apply Moonfire. Moonfire has a minimum duration of 40 seconds which means it should be reapplied on every second full eclipse cycle. The next spell in line is Wrath. This particular wrath will be casted on every cycle, either straight after the last Starfire cast or the reapplied Monfire. At this point you should start following the Solar Rotation. Cast Starsurge followed by three consecutive Wraths. Repeat this till you reach 50 Solar Energy. At this point you should cast Starfire which will strike the boss when your eclipse bar is in Lunar. The picture illustrates 2 points in the eclipse cycle where reapplying Sunfire is preferable. Sunfire has a 24 seconds duration which means it can stay up for an entire eclipse cycle. The best time to re-apply Sunfire is during the beginning or the ending of an eclipse phase. Either as the first cast in the eclipse cycle, or the last. This way you maximise your DPS. Explenation: Dot damage is not dependent on when its applied. Every damaging tick is individually calculated at the time of the tick and not dependent on when it was applied unlike all other balance druid single target spells.
The Balance Druid Double Target DPS Rotation
The changes between Single and Double target balance druid DPS rotation is minimal, however the DPS increase is significant.
The Double Target Pull Rotation

The reason for the significant DPS increase is that you can now maintain your Dots up on two targets close to 100%. Two targets basically means 50% greater chance of Shooting Stars proccing, which will help you keep Lunar/Solar Empowerment up for most of your Wrath and Starfire casts and in some cases you might even have to burn one of your charges with a Starfall to avoid having 3 charges up.
Balance Druid Double Target DPS Rotation
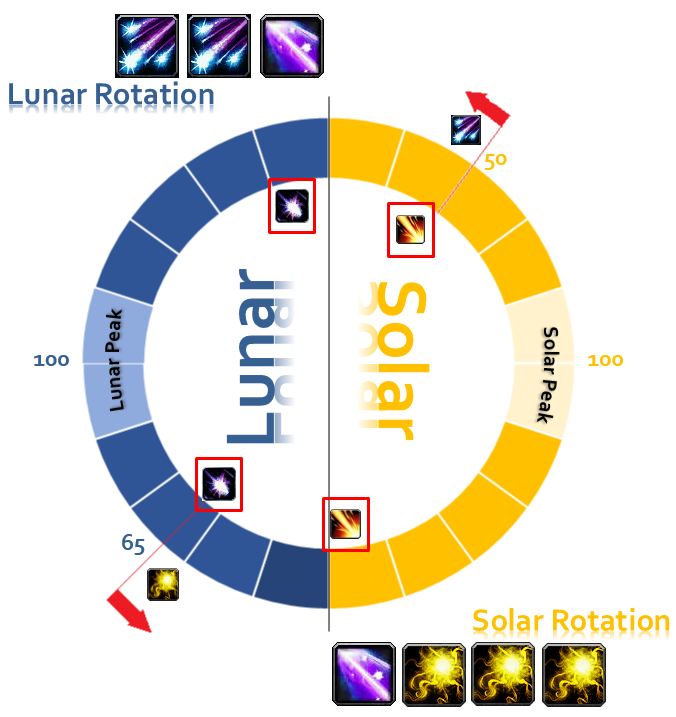
Note that not much has changed besides the addition of one Moonfire icon, however, in a double target DPS rotation choosing when to apply dots is not an option. Due to previously explained reasons, The dot reapplication should should now happen for one of the targets upon entering any eclipse and for the other upon exiting the eclipses. Monfire should only be applied in every second cycle.
The Balance Druid Multi Target DPS Rotation
The changes between Multi and single target DPS are minimal. Starfall, Moonfire and Sunfire will now player a much bigger roll in the balance druids rotation. Succeeding this rotation in practice will be fully down to the players ability to manage dots on all targets as well as managing the usage of Starfall/Starsurge charges.
The Multi Target Pull Rotation

The pre-pull rotation remains unchanged, however instead of applying Moonfire as the first gcd triggering ability after popping all DPS cool downs, use Starfall followed by as many Moonfires as it takes till all targets have been dotted. At this point resume the normal single target rotation, however, Starfall has a higher priority during the start of lunar eclipse cycle than Starsurge. Expect high levels of Shooting Star proccs.
Balance Druid Multi Target DPS Rotation

The aoe DPS rotation is very simple. Apply your dots during the of the eclipse cycles. Sunfires towards the end of Solar eclipse and Moonfire towards the end of every 2nd Lunar eclipse. Using Starfall upon entering lunar eclipse has a very high priority, however Starsurge during solar eclipse does have a priority over starfall, but make sure to keep a charge up for Starfall upon re-entering the lunar side of the cycle.
Talents Cheat Sheet
The cheat sheet below is a very generalized talent build suggestion. Due to the situational nature of healing, you’ll likely change talents nearly every encounter. For more detail, read the talent explanations below or click the Boss Guides tab to the left.
Level 15: Displacer Beast
Level 30: Ysera’s Gift
Level 45: Typhoon
Level 60: Incarnation: Chosen of Elune
Level 75: Ursol’s Vortex
Level 90: Nature’sVigil
Level 100: Euphoria
Talents Advanced
Talent Tier 1 (Level 15)
The first tier of a balance druids Warlords of Draenor talent tree is all about mobility. There is no “best pick” in this tier as your choice is 100% situational.
Feline Swiftness
Is a flat 15% movement speed increase, which stacks with the 30% movement speed increase provided when in Cat Form as well as the 10% movement speed increase provided from the cloak enchant: Gift of Mastery.
Use when: Displacer Beast or Wild Charge does not provide greater situational benefits.
Displacer Beast
Is an instant ability that triggers a global cool-down by triggering Cat Form and increasing movement speed by 50% for 4 seconds. The movement speed increase of this ability does not stack with the movement speed of Stampeding Roar, Dash or the Engineering belt tinker: Nitro Boost.
Use when: Instant movement forward can help you decrease personal damage taken or decrease time spent travelling distances of 20-40 yards. very fast while in combat
Wild Charge
Is an instant ability that bounds you back 20 yards (on flat terrain). This ability is similar to a Hunters Disengage.
Use when: Disengaging backwards can help you decrease personal damage taken or spreading a de-buff to others. For increased DPS out put only use this in fights where you are standing near a boss and instant movement backwards is required.
Editors choice: 8/10 times I go for Displacer Beast to make up for my occasionally choice of DPS > Suvivalbility Aka. finishing casts instead of moving. We all know boomkins don’t like moving!
Talent Tier 2 (Level 30)
The second tier of a balance druids Warlords of Draenor talent tree is all about survivability. There is no “best pick” in this tier as your choice is once again 100% situational.
Ysera’s Gift
Heals the balance druid for four percent of its total health, which at ilvl 650+ is approximately 9000-12000 hp. If the druid is at 100% health, this passive ability automatically heals another friendly target in your group.
Use when: Constant low raid damage is unavoidable. This is not the optimal pick during progression raids, since the other two talents provide greater control and personal gain.
Renewal
Instantly heals the balance druid for 22% health, which at ilvl 650+ is approximately 49500-66000 hp. This ability has a two minute cool-down. This ability is great because in addition to the large heal every two minutes, it can once in the fight be used combined with a Healing Tonic for, at ilvl 650, an additional 73000 hp (Taking into account the balance druids Spell Power effect on Healing tonic)
Use when: Damaging abilities need to be countered. Use combined with Healing Tonic once per fight to counter a massive damaging ability.
Cenarion Ward
Instantly buffs the player with the Cenraion Ward buff, which lasts for 30 seconds and is instantly triggered when the balance druid takes any damage, activating a healing over time buff that heals the druid for approximately 40.000 hp over 6 seconds.
Use when: to counter medium overtime damaging abilities that occur more often then once per minute. This ability can be used together with Rejuvenation. Aligning both creates a great de-buff counter strategy.
Editors choice: 7/10 times I see myself using Ysera’s Gift even though Renewal is better. Need to get rid of the Siege of Orgrimmar mentality ASAP!
Talent Tier 3 (Level 45)
The third tier of a balance druids Warlords of Draenor talent tree is all about crowd control with one of the abilities offering a situational interrupt and even tank “cooldown”.
Faerie Fire
Instantly applies a 15 seconds de-buff on the target decreasing its movement speed by 50% (does not applies to bosses) while disabling the targets ability to stealth or invisibility. Using this ability combined with the Wild Mushroom spell should greatly slow your foes movements. Besides that Faerie Fire is more conventional than Wild Mushroom, as it is target dependent and not location.
Use when: needed to assist the kiting of add(s) in various situations or when slowing adds down is necessary and a warlock is not available.
Mass Entanglement
Roots all the balance druid’s enemies that are within 8 yards of it’s main target, however any damage can (more like “will”) interrupt the effect almost instantly.
Use when: playing alone while trying to kill one strong target that is surrounded by other targets that you wish to skip.
Typhoon
Knocks back all targets in front of the balance druid within 15 yards, dazing them for 6 seconds (movement speed decrease of 40%), and interrupting their casts (does not apply to bosses + some targets cannot be knocked back).
Use when: to decrease tank damage taken from adds, to slow large groups of adds, to interrupt multiple casts (does not work on all targets).
Editors choice: 9,7/10 times I use typhoon cause none of the abilities are needed in raid fights, and I enjoy killing our paper tank by knocking adds behind his back. All because he once said “you pull you tank” forever shall he tank from behind what he pulls!
Talent Tier 4 (Level 60)
The fourth tier of a balance druids Warlords of Draenor talent tree is all about damage dealing and fully dependent on ilvl.
Soul of the Forest
Increases the damage bonus of the balance druids Lunar Empowerment buff by an additional 15%, so from 30% to 45%. At this point in the patch, this talent is not the best in practice unless the fight is close to 100% none movement.
Find out why here: Soul of the forest Forest explained
Use when: in fights where movement does not take up more than 5% of the entire fight, plus hope that you are lucky on Shooting Stars procs, because you will want to cast approximately 2.75 Starsurge’s for every full 20 seconds cycle (Euphoria) to keep the buff up for most of the fight.
Incarnation: Chosen of Elune
Increases all the balance druids spell damage by 15% for 30 seconds. This buff has a 3 minutes cool-down.
Use when: can be used in all fights, but preferably in six minutes 30 seconds+ fights that allows you approximately 30 seconds of no movement. Use together with Draenic Intellect Potions, Usable Trinkets, Celestial Alignment, Trinket procs, Blood-lust or other damage increasing buffs. Keep on cool-down unless burst is needed at specific points in the fight.
Force of Nature
Summons an ally (treant) that will instantly attempt to root your target followed by none-stop wrath casting for 15 seconds. Your haste rating impacts how fast these treants cast. At 0% haste they cast one wrath every two seconds.
Use when: Rooting multiple targets shortly after each other. The damage done by these treants is very low and does not contribute much to your overall dps. Not recommended for current PVE content.
Editors choice: 9/10 times I use Incarnation: Chosen of the Elune, simply because its very simple to use and better than all others in practice, however, I do believe that SotF will become the best talent later on this patch specially when end level content is on farm.
Talent Tier 5 (Level 75)
The fifth tier of a balance druids Warlords of Draenor talent tree is all about crowed control.
Incapacitating Roar
Incapacitates all targets within 8 yards of the balance druids location interrupting their casts (does not works on boss targets and a range of other adds)
Use when: you are part of an interrupt rotation on adds that this ability can interupt
Ursol’s Vortex
When placed in a location within 30 yards of the balance druid, the vortex will slow all targets that enter its area of effect by 50%. In addition, the first time an foe attempts to move out of the affected area it will be sucked back in. The vortex duration is 10 seconds and has a 1 minute cooldown
Use when: to help tanks kite or to slow down adds moving.
Mighty Bash
Stuns the balance druids target for 5 seconds. Require melee range.
Use when: you have been assigned to stun duties.
Editors choice: 8/10 I go for Ursol’s Vortex simply because I either don’t bother volunteering to stun specific targets. I haver never used Incapacitating Roar in a raiding environment, but I believe The other two talents are 100% task dependent.
Talent Tier 6 (Level 90)
The sixth tier of a balance druids Warlords of Draenor talent tree is all about the hybrid aspect of the druid class.
Heart of the Wild
Improves the balance druid’s ability to tank, heal and deal melee damage. Basically it enables your true ability to be hybrid for 40 seconds with a six minute cooldown.
Use when: Assigned to assist the healers for a time period of 30-40 seconds. This talent is very weak when comparing it to previous expansion
Dream pf Cenarius
Causes Moonfires and Sunfires casted at their respective peaks to heal nearby an injured ally for approximately 16500 hp
Use when: This is the only 100% passive ability in this Tier and should only be used by players who dont bother use one of the other two talents available in this tier.
Nature’s Vigil
All damaging abilities casted by the balance druid during the 30 seconds buff up-time will heal a nearby ally for 40% of the damage done. One minute 30 seconds cool-down.
Use when: all the time! This is by far the best ability. Expect 12k HPS for 30 seconds multiple times during boss fights!
Editors choice: 10/10 I go for Natures Vigil. The majority of fights in the current raiding content have a few one minute or 45 seconds repetitive abilities, which means nature’s vigil will be up to counter at least every second of these! Share this information with your healer coordinator.
Talent Tier 7 (Level 100)
The seventh tier of a balance druids Warlords of Draenor talent tree is all about damaging dealing.
Euphoria
Decreases your eclipse cycle by 50%, fro 40 seconds to 20 seconds. In addition, it decreases the cast time of spells casted while under the effect or solar and lunar empowerment by 20%. For information about how Lunar and Solar Empowerment works read the following: Empowerment explained
Use when: All the time. This talent will increase your DPS significantly regardless of the situation
Stellar Flare
An additional dot that has a cast time of 1.33 seconds and does way to little damage in comparison to the benefits of Euphoria
Use when: Its definitely an interesting talent. The de-buff duration fits perfect into a rotation where Euphoria is excluded, however, this talent would need to be considerably buffed before it becomes a viable pick!
Balance of Power
Starfires casted extends the duration of Moonfire by six seconds and Wraths casted extends the duration of Sunfire by 4 secs
Use when: never! we almost never cast our de-buffs anymore. Moonfire has a minimum duration of 40 seconds and wraths has a duration of 24 seconds which basically means we only cast Moonfire every 2nd Lunar cycle (40 seconds) and Sunfire every Solar cycle (20 sec).
Editors choice: 10/10 I go for Euphoria, Stellar Flare is currently way to weak and refreshing de-buff happens so rarely now that balance power just does not bring any major DPS increase. I think that Euphoria combined with Soul of the Forest will be huge later in this expansion.
Glyphs
Mandatory Major Balance Druid Glyphs
Glyph of Stampeding Roar: Enables the ability to be cast in all forms and affects all other players within 40 yards of the balance druid.
Use when: To help yourself get out of trouble or help other players within 40 yards range. Coordinate the usage of this ability with other fellow druids in your group.
Glyph of Untamed Stars: Added in patch 6.1, glyph of untamed stars simply keeps the balance druids Starfall as it was pre patch 6.1. Your Starfall and Sunfall now hit all enemies within 40 yards.
Use when: To maximise your DPS in situations where all adds within 40 yards are not being crowd controlled or does not need to be engaged.
Tips: Position is key. Don’t pull additional trash that does not need to be engaged. Amateur tanks will let you die to prove a childish point.
Occasional Major Balance Druid Glyphs
Glyph of Moonwarding: Moonkin form now grants 10% increased maximum health instead of 100% extra bonus armor.
Use when: a fight consist of more spell damage taken than physical damage taken.
Glyph of Astral Communion: Movement will no longer interrupt the channeling of astral communion.
Use when: A fight requires a large amount of movement with a high level of AOE required. This Glyph should be used in combination with the balance druid minor glyph solstice as well as the absence of the balance druid talent Euphoria.
Glyph of Dash: The cool-down of your Dash ability is decreased by 60 seconds, making it usable every 2 minuttes.
Use when: A large amount of movement is required multiple times throughout the entirety of a fight.
Glyph of Guided Stars: Your Starfall ability only hit targets affected by either Sun or Moonfire.
Use when: You are not allowed to hit all targets in a fight. This glyph was removed in the Warlords of Draenor patch 6.1.
Glyph of Rebirth: Players resurrected by rebirth will now return to live with 100% hp instead of 60%.
Use when: Coordinate the usage of this ability with your raid leader to avoid wasting DPS or miss-using the ability.
Glyph of Hurricane: In addition to causing damage, the balance druids Hurricane ability also slows all the target it hits by 50%. This effect seizes as soon as the target is not within the hurricane area.
Use when: when assigned to damage as well as slow groups of adds being kited by tanks
Mandatory Minor Balance Druid Glyphs
Glyph of Grace: You now take the same reduced falling damage as if you were in cat form.
Use when: in fights where you get thrown in the air to reduce falling damage. Unlike the glyph of flapping wings, the reduced damage will not prevent fatal fall damage, however you can still perform instant casts while in the air.
Occasional Minor Balance Druid Glyphs
Glyph of Flapping: Similar to mages slow fall. Can be activated in combat as well as during a fall. Using this ability before hitting the ground will prevent you from taking any fall damage however this ability needs to be channeled.
Use when: You wish to make others laugh or to prevent fall damage. Great glyph for killing people in the air
Glyph of One With Nature: Teleports the druid to a specific location in one of the following zones; Moonglade (bottom as opposed to Nighthaven), Ashenvale (Orendil’s Retreat), Sholazar Basin (nearby the Savage Thicket), Tirisfal Glades (Whispering Forest, inside a fairy ring)
Blasted Lands (The Tainted Forest) , The Jade Forest – (Near Serpent’s Heart), Valley of the Four Winds (Paoquan Hollow) and Darkshore (Grove of the Ancients)
Use when: Specially when farming Archeology or simpy when you wish to any the mentioned destination ASAP
Glyph of Aquatic Form: Increases swimming speed by 50% and enables underwater breathing.
Use when: Under water. Or above if you don’t have a water mount.
Glyph of Travel: Increases your travel form speed by 60% so it runs as fast as other 100% mounts. The speed buff is not applied if Travel Form is activated in combat.
Use when: for instant mounting after combat.
Stats
Intellect > Mastery > Critical Strike > Mutlistrike > Haste > Versatility
Intellect is your primary stat. You should look for this stat in all of your upgrades. It provides you with Spell Power, which increases the damage of your spells.
Spirit increases your combat mana regen. Once you feel comfortable with your mana, you can trade spirit for other stats. We recommend spirit levels around 1,500 (including average value from trinket effects) for most talent builds and encounters.
Haste increases your casting speed.
Mastery through ![]() Mastery: Total Eclipse increases the damage
granted by your Eclipse.
Mastery: Total Eclipse increases the damage
granted by your Eclipse.
Multistrike causes abilities to have a chance to hit a second and a third time, each dealing 30% of the initial damage.
Critical Strike increases your chance to critically hit with
all spells and abilities, and also increases the number of ![]() Starsurge charges you gain from
Starsurge charges you gain from ![]() Shooting Stars.
Shooting Stars.
Versatility increases all damage and healing done, and decreases all damage taken.
Stat Math
Stats have a very strong synergy as a Balance Druid. Mastery is an
exceptional stat, especially as, thanks to ![]() Lunar Guidance, you gain
an extra 5% of it from all sources. Whenever there are multiple targets
involved, Mastery pulls ahead because of its interactions with Multistrike,
Haste, and Critical Strike. Critical Strike is a close second because of the
ability to sustain damage in a raid. It will perform better when the encounter
has more enemies in play. Haste is also very powerful because it synergises
well with Mastery and Multistrike, as well as Critical Strike to some extent
(through
Lunar Guidance, you gain
an extra 5% of it from all sources. Whenever there are multiple targets
involved, Mastery pulls ahead because of its interactions with Multistrike,
Haste, and Critical Strike. Critical Strike is a close second because of the
ability to sustain damage in a raid. It will perform better when the encounter
has more enemies in play. Haste is also very powerful because it synergises
well with Mastery and Multistrike, as well as Critical Strike to some extent
(through ![]() Shooting Stars). Haste makes the rest of our stats perform
slightly better. Multistrike is more-or-less Critical Strike without the
Shooting Stars procs. Versatility will never be a truly desired stat because
Mastery is better for damage. Versatility is far more useful in other
playstyles (such as leveling).
Shooting Stars). Haste makes the rest of our stats perform
slightly better. Multistrike is more-or-less Critical Strike without the
Shooting Stars procs. Versatility will never be a truly desired stat because
Mastery is better for damage. Versatility is far more useful in other
playstyles (such as leveling).
Enchants
Rings: Enchant Ring – Gift of Mastery
Cloak: Enchant Cloak – Gift of Mastery
Neck: Enchant Neck – Gift of Mastery
Weapon: Enchant Weapon – Mark of Bleeding Hollow.
Gems: Immaculate Mastery Taladite
Consumables
Food: Sleeper Sushi
Potion: Draenic Intellect Potion.
Flask: Greater Draenic Intellect Flask
Hellfire Citadel Gear
This list of Best in Slot (BiS) Balance Druid gear has been designed taking into consideration the nature of Boss encounters in Hellfire Citadel and the Balance Druid Spec.
Most Important Bosses for Coins and Raid Participation 10/13
Archimonde: 3
Xhul’horac: 2
Gorefiend: 2
Tyrant Velhari: 2
Kormrok: 1
Mannoroth: 1
Kilrogg Deadeye: 1
Fel Lord Zakuun: 1
Shadow-Lord Iskar: 1
Iron Reaver: 1
Don’t use coins on Tier items, as these are the first to go for Off-Specc. Coins should be used on Trinkets/Rings/Weapons
Best Balance Druid Tier 18 Items
BiS Balance Druid Tier 18 Head Piece: Oathclaw Helm
Drops from: Kormrok
Item Level 725 – Crit + Mastery
BiS Balance Druid Tier 18 Shoulder Piece: Oathclaw Mantle
Drops from: Xhul’horac
Item Level 725 – Haste + Mastery
BiS Balance Druid Tier 18 Chest Piece: Oathclaw Vestment
Drops from: Mannoroth
Item Level 725 – Haste + Mastery
BiS Balance Druid Tier 18 Legs Piece: Oathclaw Leggings
Drops from: Gorefiend
Item Level 725 – Multistrike + Mastery
Best Balance Druid Hellfire Citadel Items (None Tier Slots)
BiS Balance Druid Neck: Vial of Immiscible Liquid
Drops from: Xhul’horac
Item Level 730 – Crit + Mastery
BiS Balance Druid Cloak: Shawl of Sanguinary Ritual
Drops from: Kilrogg Deadeye
Item Level 725 – Mastery + Multistrike
BiS Balance Druid Wrist: Manacles of the Multitudes
Drops from: Fel Lord Zakuun
Item Level 730 – Crit + Mastery
BiS Balance Druid Gloves: Felfinger Runegloves
Drops from: Archimonde
Item Level 735 – Haste + Mastery
BiS Balance Druid Belt: Belt of Misconceived Loyalty
Drops from: Shadow-Lord Iskar
Item Level 725 – Crit + Mastery
BiS Balance Druid Feet: Oppressor’s Merciless Treads
Drops from: Tyrant Velhari
Item Level 730 – Crit + Haste
BiS Balance Druid Ring (Not Including Legendary): Loathful Encrusted Band
Drops from: Tyrant Velhari
Item Level 730 – Mastery + Multistrike
BiS Balance Druid Trinket (Excluding Class Trinket): Iron Reaver Piston
Drops from: Iron Reaver
Item Level 720 – Crit + Haste
BiS Balance Druid Weapon (Excluding BiS Edict of Argus): Spur of the Great Devourer
Weapons contain Spell Power in large quantities. Spell power is almost as powerful as Intellect which makes it almost 3 times better than any other Stat. Use the HotBD Balance Druid Checker to learn more.
Intellect Weapons that does not contain Spirit will always be a greater upgrade dependent on Item level.
Blackrock Foundry
The suggested talent builds for the fights below are meant to provide the best assistance to the raid team during progression. These are not the only viable talents, and various talent combinations work for many of these fights. Also, remember that the talents are selected to maximize the potential for success on progression, not for parsing.

Oregorger
Talents
Soul of the Forest and Heart of the Wild
Strategy
- Use Soul of the Forest on each Acid Torrent.
- Use Heart of the Wild during one of the non-rolling phases for an increase to throughput.
- Use Ironbark on tanks before Acid Torrent to reduce raid damage.
- Use Stampeding Roar during the rolling phase to assist raid mobility.
- Use Displacer Beast and Barkskin for fire lines on mythic difficulty.

Hans’gar & Franzok
Talents
Soul of the Forest and Heart of the Wild
Glyphs
Strategy
- Use Soul of the Forest for Aftershock and Shattered Vertebrae damage.
- Use Heart of the Wild with your Tranquility, ideally during a period of high damage and movement. For example, the Body Slam during the non-smart stamper phase.
- Use Ironbark on a tank during Crippling Suplex.
- Place your Wild Mushroom in melee during stand still phases.

Beastlord Darmac
Talents
Incarnation and Dream of Cenarius/Heart of the Wild
Glyphs
Strategy
- We take Incarnation primarily for the final 20% phase which is very heal intensive.
- If your guild is having issues healing the final 20%, take Heart of the Wild as well.
- If not, take Dream of Cenarius for a filler for the first 80% of the encounter.
- Other than Tantrum there is almost no damage until 20% boss HP. Due to this, Dream of Cenarius is great for saving mana and providing decent damage over the course of this long encounter.
- Use Soothe on the boss and adds when they are buffed by Savage Howl.
- Use Tranquility during a Tantrum.

Gruul
Talents
Soul of the Forest and Heart of the Wild
Strategy
- Use Soul of the Forest for every other Inferno Slice to heal up that group.
- Use Heart of the Wild to damage the boss on the pull. If your team is not having any issues with the enrage, use Heart of the Wild with your Tranquility.
- Use Barkskin on every other Inferno Slice on your group.
- Use Displacer Beast to get out of Overhead Smash.
- Use Stampeding Roar to help players spread for Petrifying Slam.

Flamebender Ka’graz
Talents
Incarnation and Dream of Cenarius
Strategy
- Use Incarnation during a Summon Cinder Wolves phase to heal fixated players.
- Other than the Summon Cinder Wolves and Firestorm phases there is only very minor raid damage. Use Dream of Cenarius during this time.
- Use Ironbark on players fixated by the Cinder Wolves.
- Place your Wild Mushroom in melee to heal Molten Torrents.
- Use Tranquility and an intellect potion during a Firestorm.

Operator Thogar
Talents
Soul of the Forest and Heart of the Wild
Strategy
- Use Soul of the Forest for frequent damage from Man-at-Arms, Burning, and other abilities.
- Use Heart of the Wild with Tranquility when a Man-at-Arms is alive and/or when the raid has high stacks of Burning.
- Use Displacer Beast to avoid Moving Trains, get away with Delayed Siege Bombs, and cross fire lines or Prototype Pulse Grenades.
- Use Stampeding Roar to help the raid cross fire lines.
- Use Barkskin when a Man-at-Arms is alive or if you have high stacks of Burning.

Blast Furnace
Talents
Soul of the Forest and Heart of the Wild/Dream of Cenarius
Situational: Typhoon and Might Bash to assist with add control.
Strategy
- If you have enough spirit to sustain mana until the end of the encounter, choose Heart of the Wild for strong healing boosts.
- If you are undergeared and/or limited on spirit pieces, choose Dream of Cenarius for a mana-free filler ability.
- Use Typhoon and Might Bash to interrupt Repair and keep a low Furnace Engineer next to the Heat Regulator.
- Use Soul of the Forest to heal through frequent Blast and Volatile Fire damage.
- Use Tranquility to heal through Blast and Volatile Fire damage.
- Place your Wild Mushroom in melee.
- Use Displacer Beast and Stampeding Roar to help get Bombs to the Heat Regulator.
- Use Ironbark on tanks taking high damage.
- Use Barkskin for Blast and Volatile Fire damage.
- Use Displacer Beast to get away with Melt and Rupture.

Kromog
Talents
Soul of the Forest and Heart of the Wild
Strategy
- Use a Soul of the Forest buffed Wild Growth on each Stone Breath.
- Use Heart of the Wild to help DPS Stone Pillars – Moonfire each then Wrath spam the last one to spawn.
- Use Barkskin during Stone Breath.
- Use Tranquility during Stone Breath.
- Place your Wild Mushroom under melee to help heal Stone Breath and Slam.
- Use Displacer Beast to dodge Rippling Smash.
- Use Stampeding Roar to help the raid move between Stone Pillars after Call of the Mountain.

Iron Maidens
Talents
Soul of the Forest and Heart of the Wild/Dream of Cenarius
Situational: Mass Entanglement and Ursol’s Vortex if assigned to Admiral Gar’an’s boat.
Strategy
- Choose Heart of the Wild if more healing is needed sub-20% and/or you need to help with boat DPS.
- Choose Dream of Cenarius if sub-20% healing is fine and you need a filler for the first 80%.
- Use Displacer Beast to get away with Bloodsoaked Heartseekers.
- Use Tranquility during Sanguine Strikes.
- Use Ironbark on tanks taking Sanguine Strikes to reduce raid damage.
- Place your Wild Mushroom in either the melee or ranged stack points (decision dependent on strategy).

Blackhand
Talents
Soul of the Forest and Heart of the Wild
Glyphs
Strategy
- Use Heart of the Wild during Demolitions.
- Use Tranquility during Demolitions.
- Use Stampeding Roar for raid mobility during Demolitions.
- Use Ironbark on the active tank or on melee DPS without strong defensives for Demolitions.
- Use Displacer Beast for Marked for Death positioning.
- Place your HoTs on players before they go up to a balcony to assist in survivability.
- Use Soul of the Forest for the frequent raid damage.
- Use Heart of the Wild in phase three to assist in healing the raid.
- Use Displacer Beast in phase three immediately after getting hit by Impaled to avoid the knock-back.
- Use Barkskin whenever hit by Impaled.
AddOns
to be continued..Macros
Starsurge Trinket Macro
#showtooltip
/use 13
/cast starsurge
Starsurge optimising Macro
#showtooltip
/cancelqueuedspell
/cast [@target, exists, mod:shift][@focus, exists, harm, nomod] Starsurge; Starsurge
The macro above contains a few lines which I have not explained, however this is what it does; Cancels your next queued spell and replaces it with a starsurge. It can be very frustatting for players with great reflexes to have to wait 2.3 sec to finish an additional star fire before being able to cast starsurge.
One of the few macros that actually improve your DPS.
Solar Beam Macros
#showtooltip
/stopcasting
/target boss or npc name here
/cast Solar Beam
/targetlasttarget
or if you simply want to cast it on your focus target without changing targets use
#showtooltip
/stopcasting
/cast [target=focus,exists,nodead] Solar Beam; Solarbeam
Cellestial Alignment Berserking Macro
#showtooltip Celestial Alignment
/cast Celestial Alignment
/cast Berserking
Rejuvanation Macro for Balance Druids
#showtooltip Rejuvenation
/cast [@mouseover, help, nodead, mod]Innervate; [@mouseover, help, nodead]Rejuvenation; [@player]Rejuvenation